(Many of the links in this article redirect to a specific reviewed product. Your purchase of these products through affiliate links helps to generate commission for HomePressureCooking.com, at no extra cost. Learn more)
The Art of Assembling a Holiday Charcuterie Board
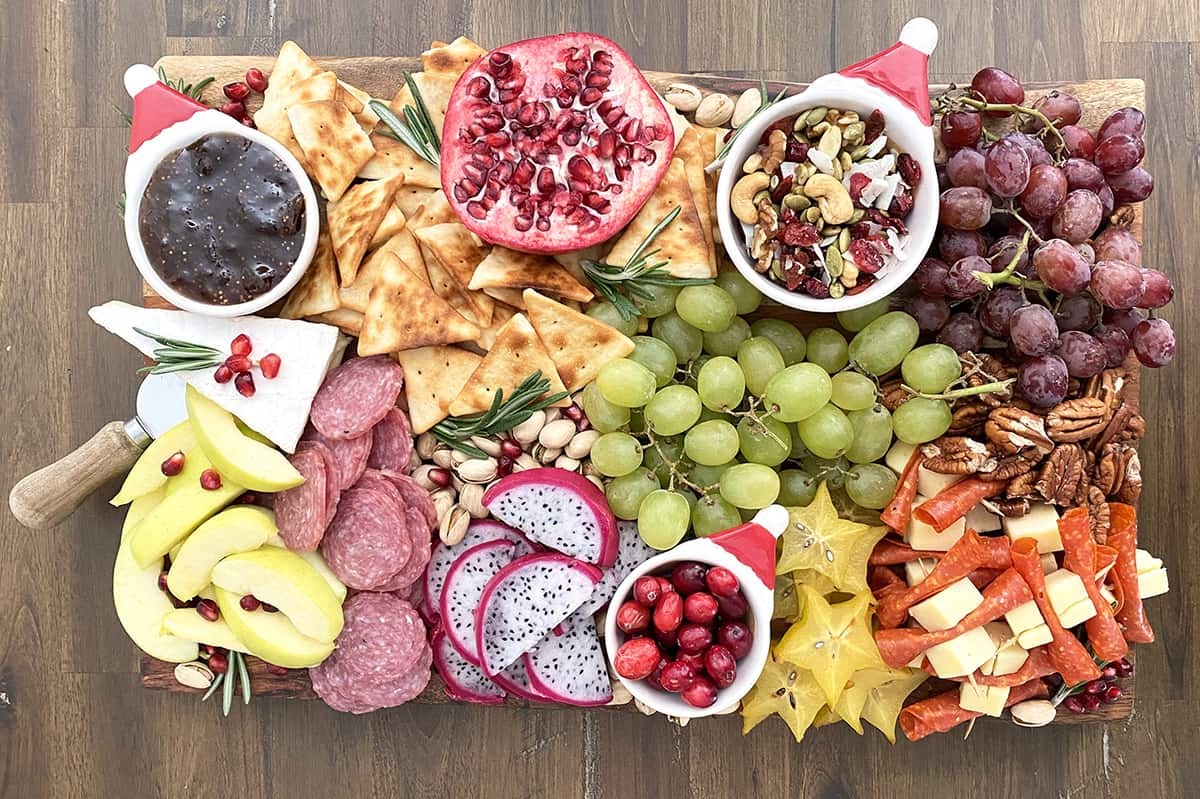
Making a holiday charcuterie board is like painting a picture where your palette is full of flavors, textures, and colors. It’s a fun way to serve food at parties because it lets guests pick and choose what they like, all while not having to settle for just one dish. If you’re like me, wanting to wow your friends and family with something that looks as good as it tastes, you’re in the right spot. Putting together your edible masterpiece involves picking out delicious ingredients, laying them out in an eye-catching way, and throwing in a few personal touches that scream “holiday cheer.”
Read more: How to Make Stuffing in the Instant Pot
Step 1: Choose Your Board
The first thing you need is a board. It can be a wooden cutting board, a marble slab, or even a large platter. The size of the board will depend on how many people you’re serving. For a small gathering, a 12-inch board should suffice. For larger parties, you might need a board that’s 18 inches or more.
Step 2: Select Your Meats
Charcuterie boards traditionally feature a selection of cured meats. For a holiday board, consider including a mix of the following:
- Prosciutto: This Italian ham is thinly sliced and has a sweet, salty flavor.
- Salami: There are many types of salami, but for a holiday board, a simple hard salami is a good choice.
- Pâté: This rich, creamy spread adds a touch of luxury to your board.
Step 3: Add Some Cheese
Next, you’ll want to add a variety of cheeses. Aim for a mix of hard and soft cheeses, as well as a range of flavors. Here are a few suggestions:
- Brie: This soft, creamy cheese is a crowd-pleaser.
- Cheddar: A sharp, aged cheddar adds a nice contrast to the softer cheeses.
- Blue Cheese: For those who like stronger flavors, a small wedge of blue cheese can be a great addition.
Step 4: Include Some Accompaniments
Now it’s time to add some extras to your board. These can include:
- Crackers and Bread: Offer a variety of textures and flavors, such as whole grain crackers, baguette slices, and breadsticks.
- Fruits: Grapes, apple slices, and dried fruits like apricots or figs add a sweet contrast to the salty meats and cheeses.
- Nuts: Almonds, walnuts, or pecans provide a nice crunch.
- Pickles and Olives: These add a tangy flavor that complements the other elements of the board.
- Spreads: Honey, mustard, and fruit preserves can be served in small bowls or ramekins.
Read more: How to Make Salsa in the Instant Pot
Step 5: Arrange Your Board
Start by placing the cheeses on the board, spacing them out evenly. Next, fold or roll the meats and place them next to the cheeses. Fill in the gaps with the accompaniments, arranging them in groups. Don’t be afraid to pile things up and let them overlap – this adds to the abundant look of the board.
Step 6: Serve and Enjoy!
Once your board is arranged to your liking, it’s time to serve and enjoy. Remember, a charcuterie board is meant to be a relaxed, communal eating experience. Encourage your guests to try different combinations of flavors and most importantly, have fun with it!
Crafting a holiday charcuterie board is more than just throwing together meats and cheeses. It’s an expression of creativity, a celebration of flavors, and a way to bring people together. By selecting the right ingredients, arranging them with care, and adding personal touches, you can create a centerpiece that captures the spirit of the season and delights your guests. So roll up your sleeves, let your creativity flow, and prepare to construct a holiday charcuterie board that will be the highlight of your festive gathering.




0 thoughts on “How to Make a Holiday Charcuterie Board”